Wednesday, March 31, 2010

Baby Quilt Design

I've been totally off the sewing wagon for months I think. I've been trying to focus on our rhythm, food and, of course, the holidays...

Meanwhile, I'm missing the sewing. I've been knitting, which helps, but it meets a different need. I like to knit while the kids are playing. That way, my Presence is felt, but I'm not involved in the play. It's perfect. And it's very calming for me, especially to do simple projects with natural yarns. I just finished these little hats for my nephews who are due in May and June. I used Blue Sky Alpacas organic cotton, my favorite yarn to knit - I love the way it feels between my fingers as I knit.

I just finished these little hats for my SILs who are both due with boys in the next two months! Note that one is much bigger than the other even though I used the same newborn pattern for each - that's what happens when Yoav sees a cute baby hat and decides to attach a string to go under the neck and try to get it on his own head! Oops. So no longer newborn, but still for a baby ;)


There's a baby blanket I really want to make from the Louisa Harding book as well. Of course I have the problem of where to buy the yarn. I found this online yarn store that has organic cotton yarn, but I'll probably get some o-wool balance (blend of organic cotton and wool) for the blanket.

Anyway... So as much as I love knitting, I'm missing sewing. Last night I started thinking about making a baby quilt for either a SIL or a friend who's due in June. I really love thinking about how to put the fabrics together and quilt patterns. I had been thinking about making myself a skirt, which would probably take me no more than an hour or so, but I find myself drawn to quilting. I feel like sewing clothes is more "productive", but there's also the issue of my mental health and since I find peace in quilting, I'm going to try going back to that for a bit. Clothes are so cheap these days, it's not even worth making your own clothes unless you enjoy it.

So.. I designed a baby quilt and planned out the fabrics. On my hand-drawn pattern, the blue represents the turquoise polka dot pattern fabric and the green is the greenish polka dot. Then the inside squares will be the bird fabric and mushroom fabric. The striped fabric will be the border. The fabric is Cloud 9 organic cotton that I purchased on Etsy from Modern Organic Fabrics (I highly recommend it - the woman who runs the shop is really nice and offers free shipping and even said she's split up shipments for me in $50 increments since I get hit with customs tax for imports over $50).
Here's the pattern and fabric plan:


I'm hoping the kids will fall asleep at a reasonable time today so I can start cutting. Jeremy is in NY, which means I can make a simple dinner and have less clean-up...

How cool is it that the boys are upstairs playing together while I wrote this?!??!? :)

Wednesday, January 27, 2010

First Block of Pinweel Baby Quilt


I made a trial block for my baby pinwheel quilt. The pattern is from "Material Obsession" by Sarah Fielke and Kathy Doughty. It was a birthday gift from my SIL and has several beautiful patterns and some helpful tips in the back. I might do another test block because the white inside the pinwheel is actually off-white/natural and it bothers me :( I don't have any white fabric :( For some reason I thought I only needed natural color, since i prefer it, but if I need to match to white, I guess I need white :( I might have to cut the rest and order some white. We'll see. Anyway, the fabric is from the Cloud 9 Organic collection - I got it all on Etsy from ModernOrganicFabrics.

Update: I just found some organic white Michael Miller fabric for $7/yard, so I'll get everything cut and wait for that...

Monday, January 25, 2010

Knit Pilot Cap


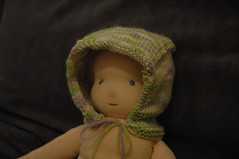
Here's the pilot cap I made for E. It's the Little Turtle Knits pattern and Purewool yarn (the wool was dyed specially for me). I loved the pattern - very clear and easy to follow and the hat is so cute. I'm now making two more for my coming nephews. And maybe one for a friend who's having a girl... It probably won't get worn much, though. The doll was my only willing participant for the photo...

Wednesday, January 13, 2010

Completed Square in Square Baby Girl Quilt!


I finished the quilt! I love how it turned out, especially since I just used fabric from my stash, and girly prints at that, which I don't have much of. I think the duck fabric is a little too orange, but it's close enough to work. I used this tutorial and I stitched in the ditch to quilt it - I stitched around each big block and around each smaller one inside.

For my next baby quilt, I want to do this same pattern, but no offset blocks - just all centered. I also want to add another border like on this quilt. And I want to make the back nicer, with a bit of patchwork using fabric from the front.

I had so much fun with this - I'm dreaming of all the future quilts I can make - and hopefully NOT on such a tight timeline - that's the only part that's not fun...

Friday, January 1, 2010

Square in Squares Baby Girl Quilt


I got the crazy idea to make a quilt for a friend who had a baby. It started because I have two friends who had baby girls and only enough girl-colored ribbon to make one of the little ribbon blankets, so, practical woman that I am, I started on a quilt :)

I'm actually amazed how fast I've been able to do it. With the help of chain stitching and setting my machine on the fastest speed , I've gotten pretty fast sewing pieces together. The slowest part for me is actually the cutting. I do NOT have good technique with cutting. I'd love a bigger cutting mat - mine is 18"x24", which is great for small projects, but too small for quilting. Although also it's on a desk - it'd probably go better if I just set it down on a hard floor.

I don't have much girl-y fabric, so I did the best I could. I'm pretty happy with the way it looks and love the basic design. I have some beautiful organic fabric I want to do a similar quilt out of. I used this tutorial.


Yoav helped me with the design and fabric choices. He got into the design process and designed one himself :) My design is (obviously on top - just included for comparison) and then his is below.

Monday, December 28, 2009

Organic Ribbon Blanket Tutorial

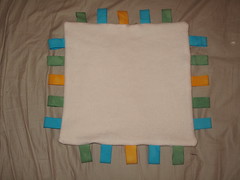
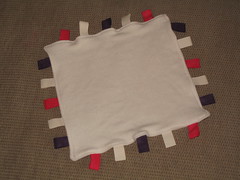
I just made this little baby ribbon blanket. I'm going to attempt my first simple tutorial for it - partly so I can remember exactly what I did so I can make lots more of these ;) It's a great little gift to give for newborns, not only because babies enjoy these little ribbon blankets, but it's also incredibly fast to make (this one took me half an hour including taking photos) and very economical (this one cost about $5 in ribbon and $2 in fabric.


FABRIC REQUIREMENTS:
* 2 13" square pieces of soft fabric - I used this organic sherpa fabric from Wazoodle. The sherpa is very thick and a bit stretchy, so it's somewhat difficult to work with. It's amazingly soft (and thick), though, so I think it'll be perfect for these. Another option is thick flannel. You can get inexpensive 8oz flannel at Organic Cotton Plus. If you only have one yard of fabric, you could cut 12" square so you can get three squares along the yard-length side.
* 20 4.5" pieces of ribbon - I used this 7/8" wide organic ribbon from Near Sea Naturals. You could also get undyed from here and dye yourself with Kool-Aid or plant dyes. Just be sure to wash a few times in hot afterward to be sure the dye is completely set!
* Thread - I used this organic thread from Near Sea Naturals. It's a pleasure to work with!


DIRECTIONS:

1. Cut fabric and ribbon.


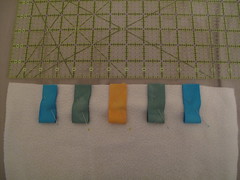
2. Attach ribbon with pins to the RIGHT side of the fabric - I attached the middle ribbon on each side 2" apart with the middle one at the 6.5" mark - so they were placed with middles at 2.5", 4.5", 6.5", 8.5" and 10.5".


3. Baste with 3/8" seam allowance (I needed 3/8" because it's thick fabric - with thinner fabric you could do 1/4" baste). If you're a perfectionist, it's worth spending a little extra time here so your ribbons end up straight - a few minutes here makes the finished product look a lot more professional. If you don't care too much, you can skip this step.


4. Pin right sides together. I put in two black head pins 3" apart in the middle of one side to remind me to leave an opening to be able to turn the blanket right side out. I like the gap to be in the middle of a side rather than at a corner to make the final pinning and topstitching a little easier.


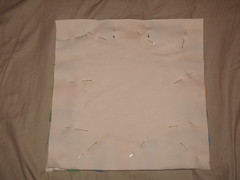
5. Make sure all ribbons are INSIDE and sew together with a 1/2" seam allowance leaving a 3" opening to turn blanket right side out.


6. Trim corners and turn blanket right side out. I was able to pull out the corners with my fingers, but depending on what fabric you use, you might need a tool such as a chopstick or knitting needle to push the corners out.


7. Iron and fold in the 3" opening and pin closed.


8. Topstitch. I did this with a 3/8" allowance because my walking foot edge is at 3/8", so I get the straightest results at 3/8" :) Also, the sherpa is very thick and difficult to stitch much closer to the edge. You can use any amount up to about 3/8" - you just want to be sure you stitch close enough to actually sew up the folded/pinned area.


ENJOY! If anyone makes this from my tutorial, please let me know! It's my first tutorial, so if there's anything that's not clear, let me know!

Ribbon Blanket


I made a Ribbon Blanket today. I tried to match the style of this one. I really like how it came out - this will definitely be a standard baby gift from now on for me! I used organic sherpa fabric from Wazoodle with organic ribbons and organic thread from Near Sea Naturals. I figure if it's something a baby is going to chew on, it should be 100% organic! I love the feel of the sherpa, but it was hard to work with even with a walking foot. I think it would be impossible with a standard presser foot. I did 1/4" seam and then did again at 3/8" to reinforce, but next time I'm going to do 1/2" seam the first time so it'll be easier to get straight. I cut the sherpa 14" square to begin with, which seems fine and the ribbon I cut 4" based on this tutorial, but she did 1/4" seam allowance and with the sherpa, you really need more (or at least I do). So next time I'll cut the ribbon 4.5" long. I'm going to make one more tonight with my modifications and post pics of both when I'm done.

BTW, the organic thread is amazing. I LOVE using it. I don't think I'll go back to regular cotton. I'll have to order a bunch more so I have a supply since Near Sea Naturals is the only company that I can find selling it :)