
Showing posts with label machine sewing. Show all posts
Showing posts with label machine sewing. Show all posts
Monday, April 8, 2013
ipad Mini Case
I made an ipad mini case for my husband's birthday. I used this tutorial from One Shabby Chick, but for the mini, I cut the pieces 7.5" x 10" (per thisblog). I didn't quilt the cover, just cut all the pieces 7.5x10. I tapered the lining pieces - the top was 7.5" wide, but the bottom tapered to 6.5" to reduce bulk from the batting. The flap was cut to 3.5"x4" (I first tried 3x4, but it seemed too small so I redid it). I added a pocket for the ear buds (pocket was made with two pieces of 7.5"X4" cotton with lightweight fusible interfacing between the two). Choosing fabric for DH was so not fun. I usually love choosing fabric for sewing projects, but here, my goal was to find something as plain as possible without being completely solid...
Sunday, October 30, 2011
Knitting Bag
I made this little knitting bag for Y's birthday (along with the tool belt). He picked the colors without knowing what I was making and I love how it turned out!
I used this tutorial. There's a little pocket inside for accessories. I think I'll put one of my stitch counters in the pocket for him. I'll give it to him with his needles and yarn inside.

Tuesday, October 25, 2011
Y's Birthday
For Y's birthday, I made him a tool belt using this pattern. I made it one inch longer and with canvas rather than thin fabric, since it will be for real tools rather than plastic ones. It doesn't have to be so perfectly useful, I know he'll love wearing it either way - the kids in Walker's books are wearing their toolbelts in all the photos and I don't see any tools sticking out :)


Saturday, August 6, 2011
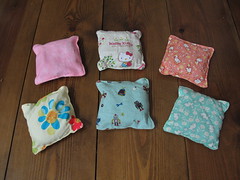
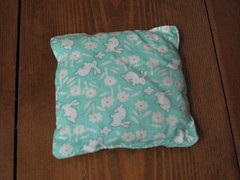
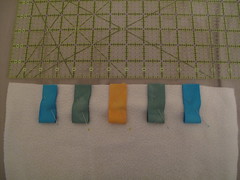
Back Pain Hot Pad - Tutorial

This will be a VERY simple tutorial, mostly for my own benefit, so I can make these again :) This is a GREAT gift for anyone with back pain. It was a request from a family friend who, of course, has back pain. She saw something similar a few years ago and told me about it and that she regretted not buying it then, since she hasn't seen anything like it since, so I volunteered to make one and thus got the benefit of her detailed description and help in implementation!
This is filled with flax seeds and can be microwaved to heat the flax (which retains heat and cold well). Then you rest it between your back and bed or couch to relieve back pain.
Materials:
26" x 15" cotton or linen or favorite fabric
matching thread
about .5 kg flax seeds (hopefully not organic like I used...)
DIRECTIONS:
1. Wash and iron fabric.
2. Cut two pieces of fabric to 13" x 15" each. (One side is longer because once the pad is filled with flax, the horizontal side shortens a bit - guess how I know that?? LOL.)

3. Fold down one of the long sides on each piece of fabric 1/2 " to the wrong side and press.

4. With right sides facing, sew three sides together with a 1/2" seam. The side with the 1/2" fabric pressed down is the side that will not be sewed. Trim corners.

5. Turn right side out, poke out corners so they look square and press.
5. With a ruler and vanishing marker, mark 12 vertical lines evenly (the total fabric width will be about 14", so the lines are about 1.17" apart.

6. Sew along these lines, going back and forth at beginning and end.

7. Measure out 1.4 oz flax seeds and fill into the first column. Pin top so seeds don't fall out.
8. Continue #7 for remaining 11 columns.
9. Topstitch closed, going back and forth at beginning and end and making sure not to sew over seeds.
10. Cut loose threads.
11. Wait for vanishing marker to disappear and give to friend who will say, "Aaaaah, Thank You!!!"
Monday, October 25, 2010
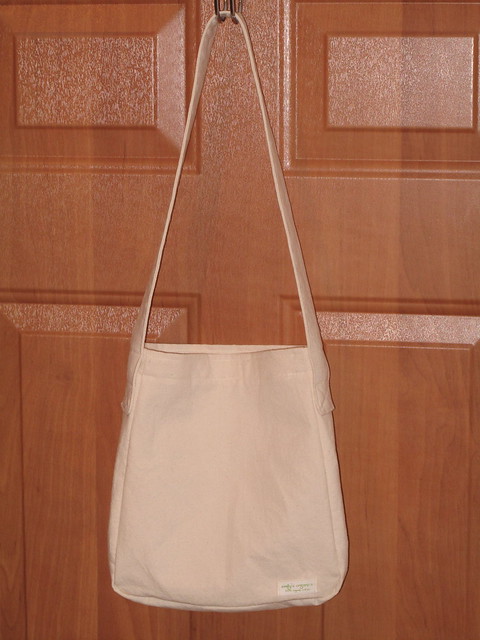
Nature Bag
I made this little bag for Y last night (another birthday gift). The pattern is from "Linen, Wool, Cotton" by Akiko Mano; fabric is organic cotton from Organic Cotton Plus. I'm hoping Y will be as happy with his. He often asks me to hold his nature bag (which is like a standard canvas bag with two handles, but his is thin cotton) while we're in the forest because it's hard for him to balance and climb while holding onto the bag. This bag is designed as a messenger bag with only one strap, so it's to be worn over his neck. I'm adding some embroidery that I'll finish tonight - his name and some elements from the Cinderberry Stitches' precious Sweet & Spotty Needle Wallet.
The bag:
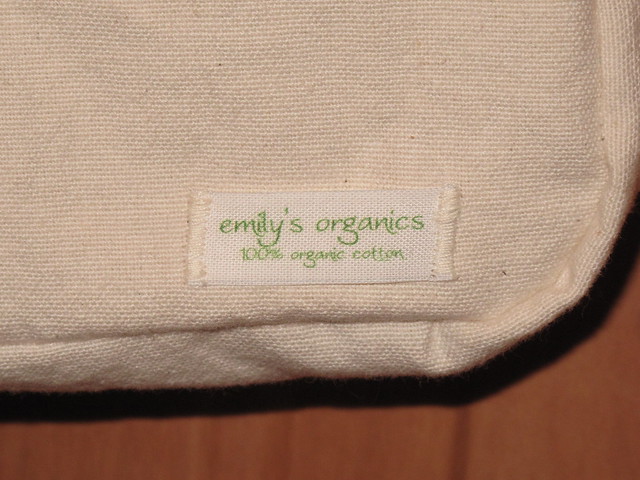
My (organic) "Emily's Organics" label that I got from greenbeanstrings on Etsy:
Finished photo (with embroidery) coming soon!
The bag:
My (organic) "Emily's Organics" label that I got from greenbeanstrings on Etsy:
Finished photo (with embroidery) coming soon!
Saturday, October 16, 2010
Stockmar Block Crayon Roll
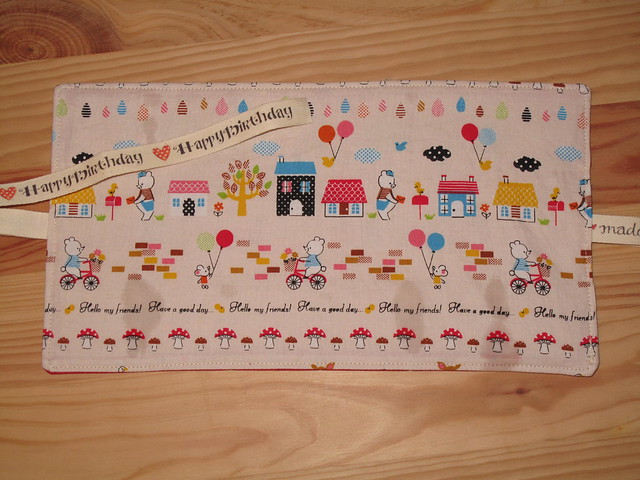
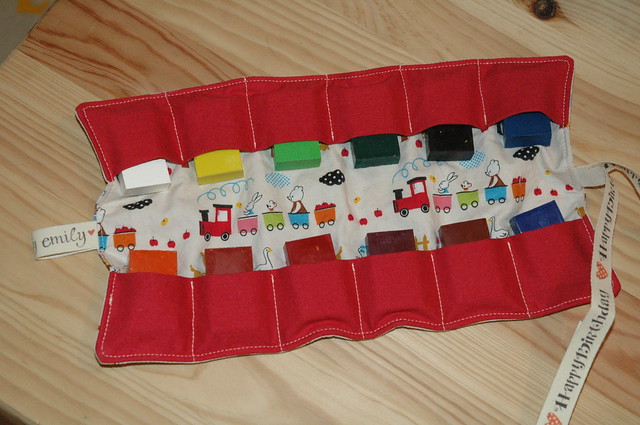

I just finished this crayon roll for Y's birthday. It can hold 12 Stockmar block crayons. Disregard the water marks - I used a water erasable pen for markings...
Measurements:
Outside fabric, inside fabric and interfacing fabric: 6.5" x 11.25"
Red fabric (two pieces): 4" x 11.25" (folded in half lengthwise before sewing to the inside fabric)
Ribbon: 20" (this time I used ribbon from Lillalotta).
Directions:
1. Cut all fabrics
2. Iron interfacing to wrong side of inside fabric
3. Fold crayon-holding fabric (my red fabric) in half lengthwise and iron. Pin in place (fold is toward the inside of the crayon roll). Make a vertical mark at 2.125" from the left edge, then four more markings every 1.75".
4. Stitch along markings, going back and forth a bit at beginning and end.
5. Fold ribbon in half with pattern on the INSIDE and topstitch to right side of inside fabric.
6. Pin ribbon to the inside fabric so you don't accidentally sew over it.
7. Place right side of outer fabric to right side of inner fabric and sew with 1/4" seam allowance, leaving a 3.5" hole for turning right side out (I left hole at short end on the side without the ribbon).
8. Trim corners and turn right side out.
9. Poke out corners with a knitting needle or similar, iron and topstitch 1/8" all around.
10. Insert crayons and enjoy!
Wednesday, June 23, 2010
Flaxseed Boo Boo Bag

Just made a little flaxseed "Boo Boo Bag". I love it. I've been wanting to make one of these for a long time. I love the feel of the flax and the size seems perfect. It's 4.5"x4.5" finished - a little bigger than the beanbags so we don't get confused. The fabric is "Sunbonnet Sue" linen/cotton blend. The fabric is so sweet - the fabric alone is enough to cheer you up - I got it for an apron I made my niece. Sunbonnet Sue is a classic quilt block that originated in the late 1800s. I once saw a beautiful Sunbonnet Sue quilt on exhibit in NYC. You can read more about her here.
A flaxseed Boo Boo Bag can be stored in the frezer and used like an ice pack. Flax lasts a long time and has high oil content so it holds the cold longer than other grains (and doesn't drip like the actual ice cube Boo Boo Bag Yoav made recently LOL). For reference, these are filled with 4oz flax.
Sunday, June 6, 2010
Beanbag / Tutorial
My sister asked me to make some beanbags for her girls. I've made a few beanbags for my kids in the past, but an OT my sister knows added a few key elements:
* Fill the bags with rice (not beans as I've done in the past)
* Put the rice first in sewn up stocking feet so if the bag tears or a seam rips, the rice won't end up all over the floor (of course, the rice is all over the floor of my sewing room due to the oh-so helpful nature of my two Helpers, so the stockings don't help much on that end)
* Fill the bags "pretty full" of rice, so they make a good thud when dropped on the ground.
They came out GREAT! The kids love them - they've been throwing them back and forth to eachother - it's so cute watching E learn how to keep his hands together to catch. We're going to be making a LOT more of these!
SO... here's my non-visual tutorial:
1. Let the kids choose fabric - what a joy for them, and not so stressful for me, since they were only choosing small pieces;
2. For each fabric, cut 2 4"x4" pieces
3. Iron fabric
4. Fill stocking foot with 2.5oz sushi rice (this rice seems perfect b/c it's a very small grain, but any small grain would do)
5. Sew up stocking foot - be careful not to catch it on a fingernail or the stocking will get a tear in it and defeat the purpose - I wonder if it might actually be better to use little baby/toddler socks instead since they'd be stronger - I'm going to try that on a bean bag and update these instructions if it works...
6. With right sides together of fabric, sew with 1/4" seam, leaving about 1.5" in the middle of one side for putting in the rice bag;
7. Trim corners, turn inside out, poke out corners with a knitting needle or sushi stick or similar...
8. Tuck in the little 1.5" section of fabric that wasn't sewn up yet.
9. Iron
10. Put in bag of rice
11. Topstitch all around
12. Cut any hanging thread
Update: If you don't mind the risk of rice all over the floor, a much easier method is to skip the stocking and fill with 3oz rice (instead of 2.5oz). Better if you have a child looking over your shoulder waiting for said beanbag ;)
* Fill the bags with rice (not beans as I've done in the past)
* Put the rice first in sewn up stocking feet so if the bag tears or a seam rips, the rice won't end up all over the floor (of course, the rice is all over the floor of my sewing room due to the oh-so helpful nature of my two Helpers, so the stockings don't help much on that end
* Fill the bags "pretty full" of rice, so they make a good thud when dropped on the ground.
They came out GREAT! The kids love them - they've been throwing them back and forth to eachother - it's so cute watching E learn how to keep his hands together to catch. We're going to be making a LOT more of these!
SO... here's my non-visual tutorial:
1. Let the kids choose fabric - what a joy for them, and not so stressful for me, since they were only choosing small pieces;
2. For each fabric, cut 2 4"x4" pieces
3. Iron fabric
4. Fill stocking foot with 2.5oz sushi rice (this rice seems perfect b/c it's a very small grain, but any small grain would do)
5. Sew up stocking foot - be careful not to catch it on a fingernail or the stocking will get a tear in it and defeat the purpose - I wonder if it might actually be better to use little baby/toddler socks instead since they'd be stronger - I'm going to try that on a bean bag and update these instructions if it works...
6. With right sides together of fabric, sew with 1/4" seam, leaving about 1.5" in the middle of one side for putting in the rice bag;
7. Trim corners, turn inside out, poke out corners with a knitting needle or sushi stick or similar...
8. Tuck in the little 1.5" section of fabric that wasn't sewn up yet.
9. Iron
10. Put in bag of rice
11. Topstitch all around
12. Cut any hanging thread
Monday, December 28, 2009
Organic Ribbon Blanket Tutorial
I just made this little baby ribbon blanket. I'm going to attempt my first simple tutorial for it - partly so I can remember exactly what I did so I can make lots more of these ;) It's a great little gift to give for newborns, not only because babies enjoy these little ribbon blankets, but it's also incredibly fast to make (this one took me half an hour including taking photos) and very economical (this one cost about $5 in ribbon and $2 in fabric.

FABRIC REQUIREMENTS:
* 2 13" square pieces of soft fabric - I used this organic sherpa fabric from Wazoodle. The sherpa is very thick and a bit stretchy, so it's somewhat difficult to work with. It's amazingly soft (and thick), though, so I think it'll be perfect for these. Another option is thick flannel. You can get inexpensive 8oz flannel at Organic Cotton Plus. If you only have one yard of fabric, you could cut 12" square so you can get three squares along the yard-length side.
* 20 4.5" pieces of ribbon - I used this 7/8" wide organic ribbon from Near Sea Naturals. You could also get undyed from here and dye yourself with Kool-Aid or plant dyes. Just be sure to wash a few times in hot afterward to be sure the dye is completely set!
* Thread - I used this organic thread from Near Sea Naturals. It's a pleasure to work with!
DIRECTIONS:
1. Cut fabric and ribbon.
2. Attach ribbon with pins to the RIGHT side of the fabric - I attached the middle ribbon on each side 2" apart with the middle one at the 6.5" mark - so they were placed with middles at 2.5", 4.5", 6.5", 8.5" and 10.5".
3. Baste with 3/8" seam allowance (I needed 3/8" because it's thick fabric - with thinner fabric you could do 1/4" baste). If you're a perfectionist, it's worth spending a little extra time here so your ribbons end up straight - a few minutes here makes the finished product look a lot more professional. If you don't care too much, you can skip this step.

4. Pin right sides together. I put in two black head pins 3" apart in the middle of one side to remind me to leave an opening to be able to turn the blanket right side out. I like the gap to be in the middle of a side rather than at a corner to make the final pinning and topstitching a little easier.
5. Make sure all ribbons are INSIDE and sew together with a 1/2" seam allowance leaving a 3" opening to turn blanket right side out.
6. Trim corners and turn blanket right side out. I was able to pull out the corners with my fingers, but depending on what fabric you use, you might need a tool such as a chopstick or knitting needle to push the corners out.
7. Iron and fold in the 3" opening and pin closed.
8. Topstitch. I did this with a 3/8" allowance because my walking foot edge is at 3/8", so I get the straightest results at 3/8" :) Also, the sherpa is very thick and difficult to stitch much closer to the edge. You can use any amount up to about 3/8" - you just want to be sure you stitch close enough to actually sew up the folded/pinned area.
ENJOY! If anyone makes this from my tutorial, please let me know! It's my first tutorial, so if there's anything that's not clear, let me know!
FABRIC REQUIREMENTS:
* 2 13" square pieces of soft fabric - I used this organic sherpa fabric from Wazoodle. The sherpa is very thick and a bit stretchy, so it's somewhat difficult to work with. It's amazingly soft (and thick), though, so I think it'll be perfect for these. Another option is thick flannel. You can get inexpensive 8oz flannel at Organic Cotton Plus. If you only have one yard of fabric, you could cut 12" square so you can get three squares along the yard-length side.
* 20 4.5" pieces of ribbon - I used this 7/8" wide organic ribbon from Near Sea Naturals. You could also get undyed from here and dye yourself with Kool-Aid or plant dyes. Just be sure to wash a few times in hot afterward to be sure the dye is completely set!
* Thread - I used this organic thread from Near Sea Naturals. It's a pleasure to work with!
DIRECTIONS:
1. Cut fabric and ribbon.
2. Attach ribbon with pins to the RIGHT side of the fabric - I attached the middle ribbon on each side 2" apart with the middle one at the 6.5" mark - so they were placed with middles at 2.5", 4.5", 6.5", 8.5" and 10.5".
3. Baste with 3/8" seam allowance (I needed 3/8" because it's thick fabric - with thinner fabric you could do 1/4" baste). If you're a perfectionist, it's worth spending a little extra time here so your ribbons end up straight - a few minutes here makes the finished product look a lot more professional. If you don't care too much, you can skip this step.
4. Pin right sides together. I put in two black head pins 3" apart in the middle of one side to remind me to leave an opening to be able to turn the blanket right side out. I like the gap to be in the middle of a side rather than at a corner to make the final pinning and topstitching a little easier.
5. Make sure all ribbons are INSIDE and sew together with a 1/2" seam allowance leaving a 3" opening to turn blanket right side out.
6. Trim corners and turn blanket right side out. I was able to pull out the corners with my fingers, but depending on what fabric you use, you might need a tool such as a chopstick or knitting needle to push the corners out.
7. Iron and fold in the 3" opening and pin closed.
8. Topstitch. I did this with a 3/8" allowance because my walking foot edge is at 3/8", so I get the straightest results at 3/8" :) Also, the sherpa is very thick and difficult to stitch much closer to the edge. You can use any amount up to about 3/8" - you just want to be sure you stitch close enough to actually sew up the folded/pinned area.
ENJOY! If anyone makes this from my tutorial, please let me know! It's my first tutorial, so if there's anything that's not clear, let me know!
Ribbon Blanket

I made a Ribbon Blanket today. I tried to match the style of this one. I really like how it came out - this will definitely be a standard baby gift from now on for me! I used organic sherpa fabric from Wazoodle with organic ribbons and organic thread from Near Sea Naturals. I figure if it's something a baby is going to chew on, it should be 100% organic! I love the feel of the sherpa, but it was hard to work with even with a walking foot. I think it would be impossible with a standard presser foot. I did 1/4" seam and then did again at 3/8" to reinforce, but next time I'm going to do 1/2" seam the first time so it'll be easier to get straight. I cut the sherpa 14" square to begin with, which seems fine and the ribbon I cut 4" based on this tutorial, but she did 1/4" seam allowance and with the sherpa, you really need more (or at least I do). So next time I'll cut the ribbon 4.5" long. I'm going to make one more tonight with my modifications and post pics of both when I'm done.
BTW, the organic thread is amazing. I LOVE using it. I don't think I'll go back to regular cotton. I'll have to order a bunch more so I have a supply since Near Sea Naturals is the only company that I can find selling it :)
Sunday, November 8, 2009
Sweet and Spotty Needlecase
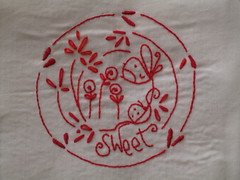
I'm making Natalie Lymer's adorable Sweet & Spotty Needlecase. I finished all the embroidery. Unfortunately I used two slightly different DMC threads - one is slightly darker than the other. I didn't even realize but the second I showed Yoav he mentioned it. Of course, he's so sweet he said he liked it with the two colors and I can barely tell and it's a project for me anyway, so I'm just going to leave it. If it were a gift, I'd probably fix it. Also I did all the inside flowers Laisy Daisy stitch instead of Satin because I'm lazy :) No, actually it's just because I don't like doing satin stitch. I need a Pigma Micron Size 1 pen to get it a little better - my lines were a bit thick which makes it hard to do perfect embroidery. I used a water soluble fabric pen, which was quite thick, but at least it completely erases at the end, which is nice for people who don't do perfect embroidery ;)
Tuesday, January 13, 2009
Knitting Needle Case
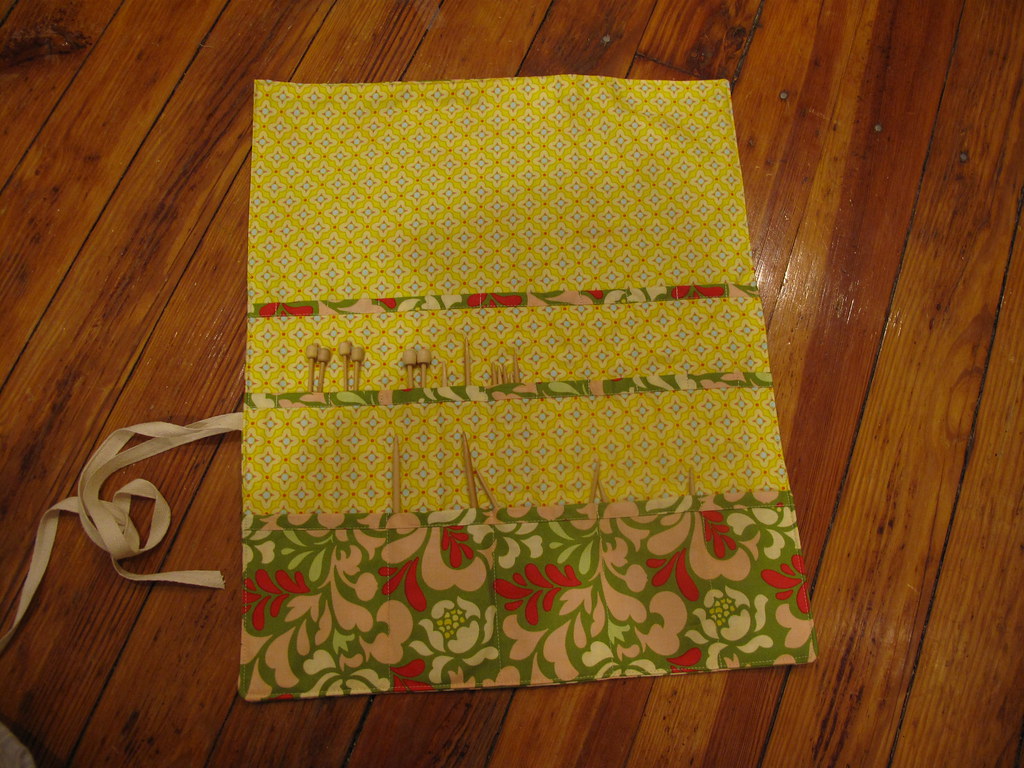

I just finished sewing this knitting needle case. I LOVE it. It's a gift for my SIL.
The pattern is here. The fabric is Free Spirit by Heather Bailey. It's not my favorite fabric, but I was trying to find something my SIL would like, not just my favorite. In the end, it's probably not ideal for either, but I'm pretty happy with it. I can't wait to pick out fabric to make one for me now!
The only modification I made to the pattern was to come in 1.75" instead of 2" on the right when making the lines because it seemed like (correctly IME from the finished product) there otherwise wouldn't be enough space on the left. I tested a little and see that the top row is really for 14" needles - smaller needles can fall down into the pocket. I don't use any 14", so for mine, I'll stitch a bottom to the rows about 8" down for the first row and a little less for the second row - I'll have to see what length my DPNs are and I'll make the bottom for the second row about an inch less than them. The bottom row is fine for me - it's for circular needles and notions. It also needs to be 1.5" wider for it to come out perfectly. My left column is only .75" and right column is 1". So I'll make that adjustment too. My ribbon is 100% linen and is 1 yard long.
Subscribe to:
Posts (Atom)